Remove Bios password on Dell with: 3A5B, 595B, 2A7B, D35B.
Faster Bios password Solution on Biosremoval.com WORKS 100% go to Dell Primary or Administrator password page.
To reset or clear the password that is set inside the BIOS or UEFI of a Dell desktop, all-in-one, or laptop:
- Browse to the Dell Manuals website.
- Identify your Dell product
- Enter the Service Tag, Express Service Code, or the Serial number of the Dell product and click Search.
- Or, click Browse all products to manually select your Dell product from the catalog.
- Locate the service manual under the Manuals and Documents section.
- Click View PDF or View Page next to the service manual of the Dell computer.
- Follow the instructions under the Deleting or changing an existing system setup password section.
How to recover a forgotten BIOS password on a Dell laptop
BIOS passwords can be recovered. If you have forgotten one of the passwords that is set in the BIOS, contact Biosremoval Technical Support to obtain a password release code. The password release code is based on the unique password prompt that is generated using information from your Dell laptop.
How to recover a forgotten BIOS password on a Dell desktop
BIOS passwords can be recovered. If you have forgotten one of the passwords that is set in the BIOS, resetting the CMOS or NVRAM helps reset the BIOS to factory default settings and remove the passwords from the BIOS.
For Easier Bios password removal on Dell Laptop please see link below
For Dell with service tag DELL-XXXXXXX-3A5B
For Dell with service tag DELL-XXXXXXX-595B
For Dell with service tag DELL-XXXXXXX-2A7B
For Dell with service tag DELL-XXXXXXX-D35B
- Before you begin, follow the Safety Precautions When Working with Electronic and Electrical Equipment.
- Turn off the computer and disconnect the power cable from the computer.
- Locate the password reset jumper (PSWD) on the system board.
- Remove the jumper plug from the password jumper-pins.
- Power on without the jumper plug to clear the password.
- Wait until the desktop is loaded and then shut down the computer and replace the jumper plug in its original location.
PASSWORD WORKS 100% on Dell:
Alienware, Inspiron, Legacy Desktop Models, OptiPlex, Vostro, XPS, G Series, G Series, Alienware, Inspiron, Latitude, Vostro, XPS, Legacy Laptop Models, Latitude Tablets, XPS Tablets, Fixed Workstations, Mobile Workstations
To use the jumper to reset the BIOS password
- Ensure that your work surface is flat and clean to prevent scratching your computer's cover.
- With your computer still turned off and unplugged, remove your computer's cover.
- To locate the password jumper on the motherboard, look for the letters PWD, PSWD, or PSWDCLR.
- Choose an option:
If there are 2 metals pins under the jumper
- Remove the jumper from the pins, replace the computer cover, reconnect the power cable and monitor, and turn on the computer.
- After the Windows login screen appears, turn off the computer.
- Again, disconnect the power cable and monitor. Press and hold the power button for 10 seconds to release static electricity from the system.
- Remove your computer cover.
- Replace the jumper in its original position covering the 2 pins. This will enable password feature.
- Replace the computer cover.
- Reconnect the power cable and other connections and turn on the computer.
If there are 3 pins under the jumper, see Figure 1 below.
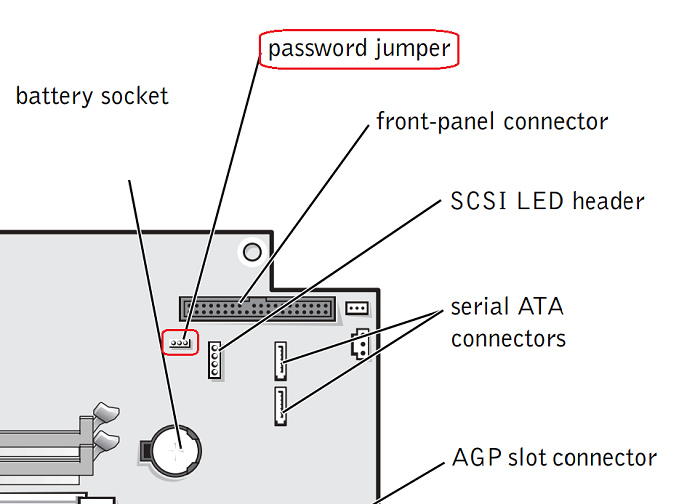
Figure 1 - Generic motherboard illustration showing a 3-pin password jumper, your motherboard may vary, see the product documentation for your system for specific instructions.
- Remembering which two pins are covered, remove the jumper from those pins.
- Reinstall the jumper in a different position. For example, if you removed the jumper from pins 2 and 3, reinstall the jumper over pins 1 and 2.
- Replace the computer cover and reconnect the power cable and monitor.
- Turn on the computer and wait 5 s. Then press and hold the Power button until the computer turns off again.
- Disconnect the power cable and monitor again. Press and hold the Power button for 10 s to release static electricity from the system.
- Replace the jumper over the original 2 pins.
- Replace the computer cover.
- Reconnect the power cable and other connections and turn on the computer.